
Just FYI: The Recipes always come first here at MNCR
Sourdough Bread
- January 9, 2019
- Heather
Don’t give up on having fresh sourdough bread on your table. Use this easy to follow guide to help you make amazing bread.
- Cook Time40 min
- Ready in24 hrs
- Serves2 Loaves
- Suitable for Diet
- Diabetic
- Low Salt
- Vegan
Ingredients
For the Bread
- 600 g OR 4 C All Purpose White Flour
- 600 g OR 4 C Whole Wheat Flour
- 1000 g OR 5 1/2 Cups Cold Water
- 25 g OR 1 1/2 TBS tsp Salt
- 100 g OR 1/2 C Sourdough Starter
For The Sourdough Starter
- 50 g OR 4 TBS Whole Wheat Flour
- 50 g OR 3 1/2 TBS Water
- 2 TBS Starter
Method
Phase 1 - 4PM (ish)
Combine the the water, white flour and wheat flour from the bread list of ingredients in a bowl. Mix until all of the flour is wet. No need to knead. This is called an autolyse.
In a bowl or mason jar, add your sourdough starter, flour and water from the sourdough starter list of ingredients and combine until all the ingredients are wet.
Cover both the bowl and the starter mixture with saran wrap or a lid. Let them sit for 4 hours.
Phase 2 - 8 (ish)
Uncover both the autolyse and fed starter. Add 100 grams of starter (1/2 C) to the autolyse. Using the back of a spoon, try your best to spread the starter over the top of the autolyse.
Wet your fingers and poke the dough, pushing the starter inside of the dough as best and evenly as you can.
Do 4 stretch and folds, wetting your fingers again if needed. Then add the salt, sprinkling it as evenly as possible across the top of the dough.
Again, wetting fingers is needed, poke the salt into the dough as best and evenly as you can.
Do 4 more stretch and folds and cover with a lid or saran wrap. Set a timer for 30 minutes and let it rest.
Stretch and Folds- 8:30-10:00 PM
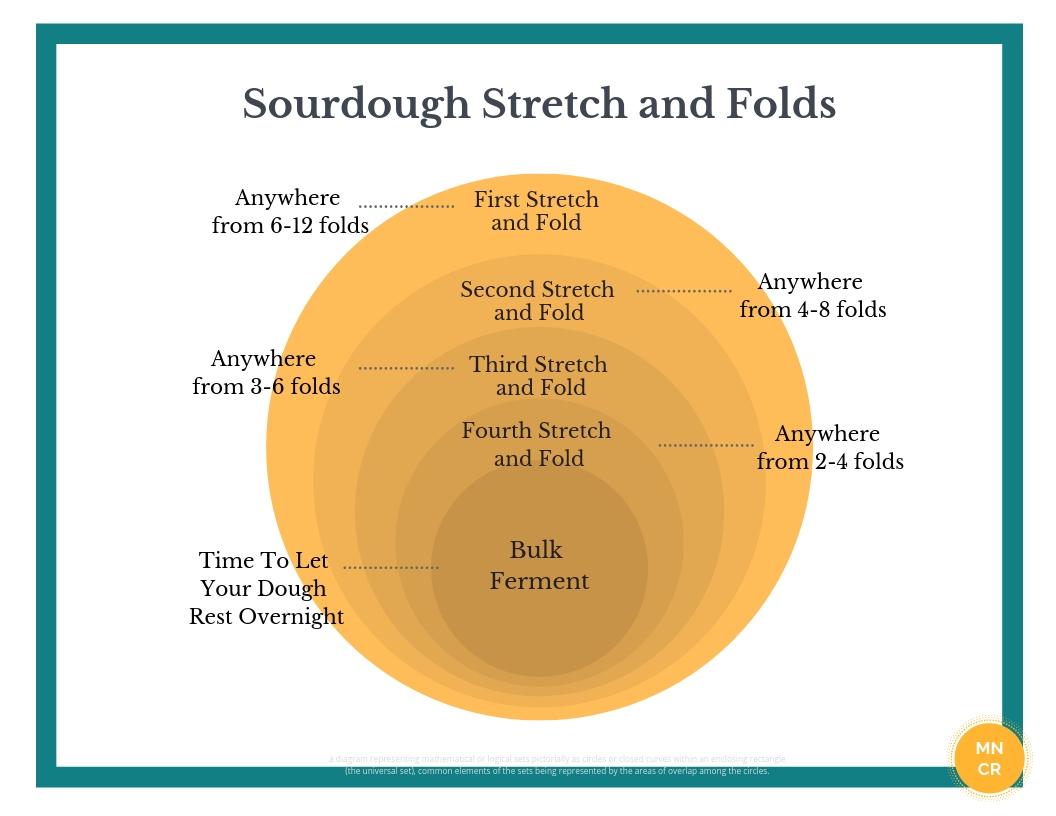
After 30 minutes, uncover the dough, wet your fingers, and stretch and fold 4-6 times. See below for help on learning how to stretch and fold.
After you stretch and fold, cover the dough again and set a timer for 30 minutes. Repeat this step (4-6 stretch and folds then 30 minute rest), 3 more times – 9:00, 9:30 and 10:00.
Phase 3 - Bulk Fermentation
After the final stretch and fold at 10 pm, cover the dough and let it sit on your counter overnight. This is called ‘Bulk Fermentation’.
Phase 4 - Around 8 am
The next morning your dough should be bubbly and should have risen at least double. Wet your fingers and do 4 more stretch and folds.
Wipe your counter clean with a damp rag, leaving some water on the counter behind from the rag. Pour the dough onto the dampened counter and cut into to halves.
Take 2 loaf pans and spray them with nonstick spray. You can also butter them if you don’t want to use a spray.
Shape the loaves (see below for help on shaping), and then place one loaf to each pan. Cover with a dampened towel and let them rise for 2 hours.
After 2 hours, set your oven to 500 degrees F. Once the oven has reached 500, put the loaves in. Add 3 ice cubes to the bottom of the oven to create steam and quickly close the door. Set a timer for 20 minutes. After 20 Minutes turn your oven down to 450 and bake for an additional 20 minutes.
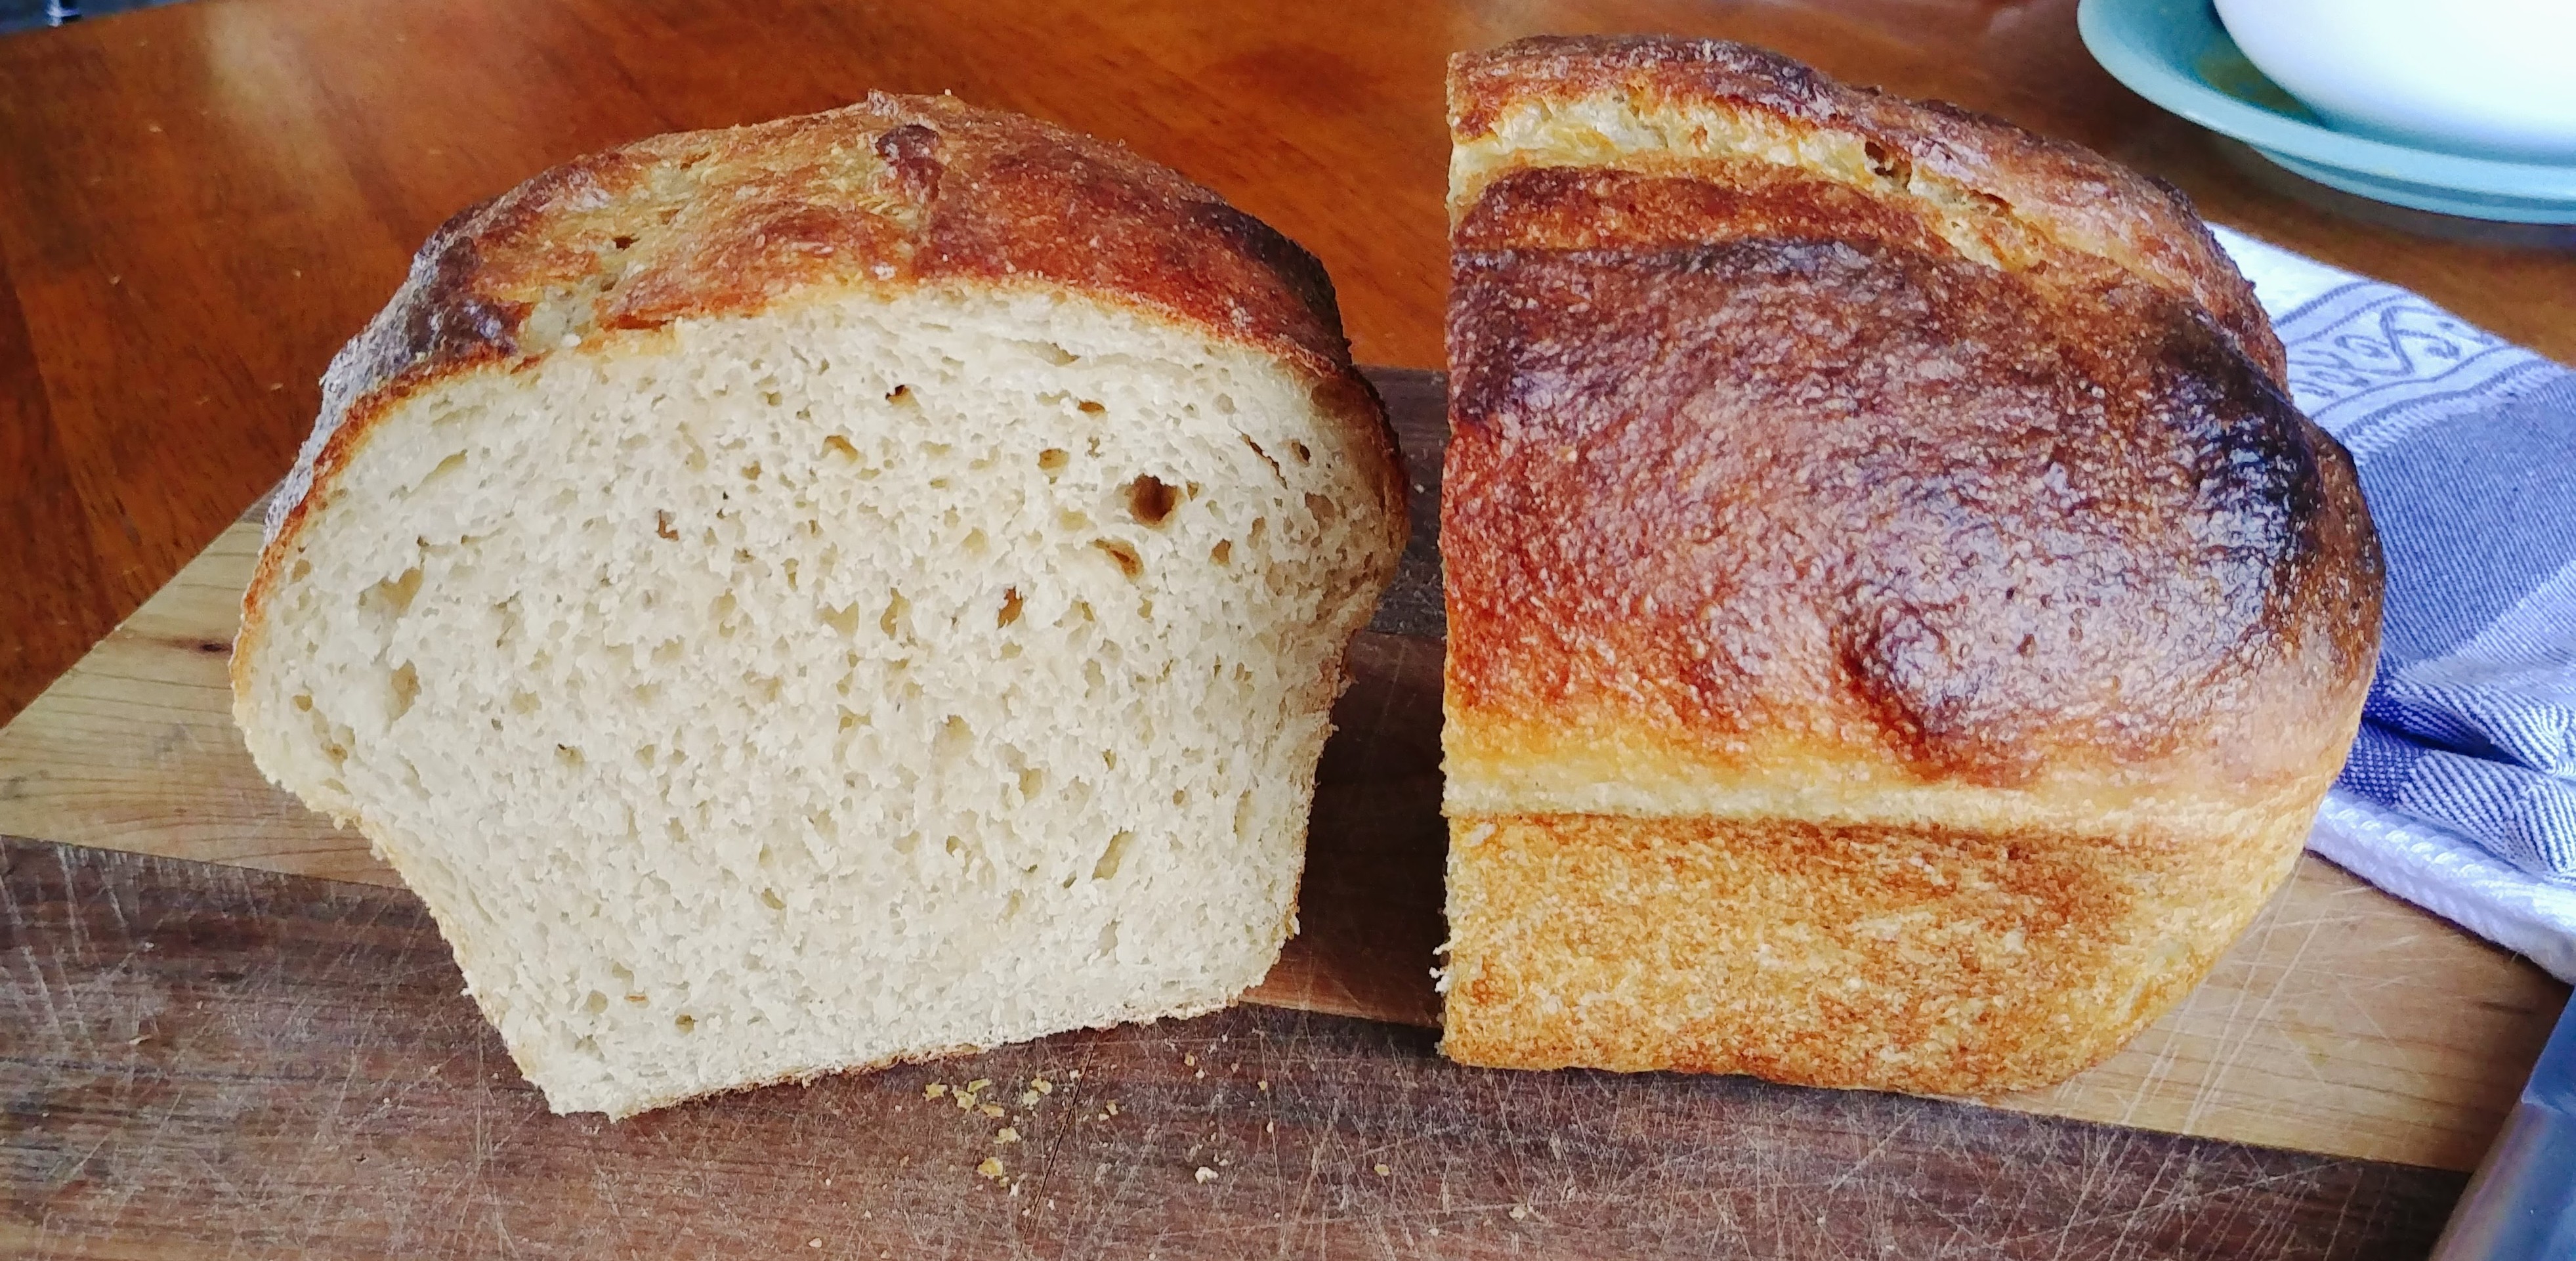
Once done the tops should be dark brown and the sides should be golden brown. When you tap it on the bottom it should sound hollow. If it’s not, put the loaf back into the pan for another 5-10 minutes.
Once done, remove the loaves from the pans and place them on a cooling rack. Let cool before consuming…if you can.
Enjoy professional artisanal bread from your very own home!
Sourdough bread takes a day to make, but most of that time is just waiting for the bread to do it's thing.
PHASE 1 – AUTOLYSE AND STARTER: Autolyse is just a fancy term that means your going to combine only your flour and water and let them sit for a few hours to hydrate. The great thing that happens when you autolyse is that it also starts to work the gluten which means you have less work to do when it comes to kneading. Yay!
METHOD: In a bowl, combine the water, white flour and wheat flour in a bowl. JUST FYI – You can actually make this with all white or all wheat flour. Anywho…Mix with a spoon, making sure that all of the flour is getting wet. It’s important to be a bit anal here so that you make sure not to leave any dry flour. It has happened to me and it sucks when you discover dry flour 4 hours later. Cover with saran wrap and let it sit on the counter for 4 hours. Your autolyse can sit for all day if you really wanted to, so if your schedule needs some wiggle room, this is a great place to do it.
FEED STARTER: Next you’re going to get your sourdough starter out of the fridge. You need to feed it before you use it so it becomes active. Throw away all but 2 -3 TBS (just eyeball this, it doesn’t need to be perfect). Then add 50 grams of wheat flour and 50 grams of water. Mix together until all the flour is wet. Cover with saran wrap and set it next to your autolyse. It can sit up to 8 hours as well. You don’t want to go to far past 8 hours though, because then your starter will have eaten up all it’s “food” and will start to starve again. Four hours is optimal as the starter is in peak condition. I use wheat flour with my starter as it helps with the flora and fauna of the sourdough start. You can use white flour if you wish.


You can make amazing bread
PHASE 2 – STRETCH AND FOLD: After 4 hours your sourdough starter should have about doubled in size. It doesn’t need to be exact but it should be close. It should also have beautiful bubbles and look active. If it looks like it needs more time, give it more time.
If your starter is good to go, it’s time to add the rest of your ingredients and get going. First you’re going to add 100 grams of your activated sourdough starter to the dough. I like to use a spoon and spread it evenly over the top of your autolyse. I then wet my fingers to keep them from sticking, and poke the starter into the autolyse. This helps to incorporate the starter into the dough more evenly. Then you’re going to do 4 stretch and folds. It’s a good idea to keep a bowl of water next to you as you do this to keep your fingers wet so the dough sticks less to you. Next sprinkle the salt evenly over the top. I like to wait to add the salt until the sourdough is more incorporated because it can stunt or slow down the start. You’ll do the same thing with the salt as you did with the starter by wetting your fingers and poking it into the dough. After this do 4 more stretch and folds, remembering to keep your fingers damp.
At this stage in the bread making process your dough is pretty loose, making it easier to do 6-8 stretch and folds without ripping your dough. The more stretch and fold sessions you have with 30 minute breaks in between, the tighter your dough will become and the less stretch and folds you’ll be able to do.
STRETCH AND FOLD TIPS: It’s important not to stretch the dough past its limits. Your dough is going to start resisting the stretches more and more as you go. Don’t try to push it past it’s max causing it to tear. If your dough tears, back off and let it rest. The whole purpose of the stretch and folds is to work up the gluten to build strength so that when you go to bake it, it keeps it’s shape and structure. You can think of it like an actual house. If a builder puts too many nails in the frame of a house, that wood becomes brittle and loses it’s strength. If pushed too far, it may even collapse, just like your loaf would.
"You guide Me" - So i married an axe murderer.
NEXT SETS OF STRETCH AND FOLDS: After your first stretch and fold let your dough rest for 30 minutes. After that it’s ready for another round. Make sure to pay attention to your dough’s stretching point. Let the dough guide you. You’ll be able to feel it resisting your stretches. When you can only stretch it a few inches then it’s time to let it rest. Do a total of 4 stretch and fold rounds, each with a 30 minute resting period in between. The more sets of stretch and folds, the less the dough will let you stretch it. A good thing to remember is start with high reps and end with low reps.
STRETCH AND FOLD TECHNIQUE: Wet your fingers to keep them from sticking too much (They still may stick a little bit). With your fingers and thumbs, grab one side of your dough. Pull up as far as it will go with out ripping. Usually this is a good 6 inches or so. If you need to give it a wobble/shake as you pull up, sometimes that helps to get a good healthy stretch. Then fold it over the rest of the dough. Rotate your bowl 1/4 to the right (or left if you’re a leftie 🙂 and do it again. Wet your fingers, grab the side and pull up. Each time you fold you’ll create a point. So when you turn the bowl 1/4 to do another stretch and fold, feel free to use the point as a natural place to grab. Do as many times as the dough lets you.
And so the magic begins...
PHASE 3 – BULK FERMENT: At this point, your dough has worked up it’s strength. Now it’s time to let your dough rest and sour. Cover your bowl with saran wrap or a lid. Let it sit on the counter at room temperature overnight, or at least for 10 hours and all the way up to 14 hours.
WHERE DOES SOURDOUGH GET IT’S FLAVOR?: Sourdough bread contains two types of acids that give it it’s amazing flavor and texture. Acetic Acid and Lactic Acid. Acetic Acid thrives in cool temperatures, aka the fridge, and creates the sharp tangy sour flavor in sourdough bread. Lactic acid thrives in warmer temperatures, aka the counter top, and creates a buttery yet and subtle tangy flavor. Depending on how you want you loaf to taste you can adjust your counter and fridge time.
IF YOU CHOOSE TO REFRIGERATE: If you want to play around with the flavors and choose to refrigerate your dough remember 2 things. 1 – refrigeration slows down the souring process, so leave it in the fridge for a good 12-16 hours to let it do it’s thing. 2 – Your bread needs to come up to room temperature in order to rise which may take 4-8 hours on the counter top. Keep this in mind while you’re deciding what to do with your loaf. As for me, I don’t refrigerate and the sourness is perfect.
Shape those buns...i mean loaves!
PHASE 4 – SHAPING YOUR LOAVES: After you’ve let your dough bulk ferment on the counter over night or for at least 8 hours, it’s time to shape your loaves and let them rise. First, wet your fingers take your dough and do 4-6 more stretch and folds. You’ll notice that the dough is “slack” as it has rested all night.
Next, get two loaf pans and spray them with nonstick spray or butter them thoroughly. If you’re new to bread making and are afraid after all this hard work that your loaves will stick, use the nonstick spray. I have never had too big of an issue getting my loaves out with the spray. Then, take a damp cloth and wipe down your surface. Leave some water behind from the rag as this will help to keep the dough sticking to the counter top. Pour out your dough onto the damp countertop and using a knife, pizza cutter or bench knife cut the dough into two equal parts.
It’s time to shape those buns…I mean loaves. First, wet your fingers. Next, when you cut the dough in half and separate. Then, taking one half, wet you fingers and press the dough down evenly, trying to get out most of the air bubbles. Next, take one side and fold it onto the dough about 1/3 of the way. Do the same to the other side, overlapping the other fold. Now you’ve created two sides that are folded in on eachother, and two sides that are open. Wet your fingers again, and taking one of the open sides roll the open side over the seam you made by folding. Place it into the loaf pan. Repeat with the other loaf. Cover the loaves with a damp rag and let it rise for 2 hours on the counter top.
Whisper words of wisdom, let it be...EE!
After 2 hours, your loaves should have risen a little bit. They should be bubbling over the top just barely. If they haven’t moved very much let them rise for another hour or two. A good thought it to let them rise so that the tops are just barley over the pan. Set your oven to 475 degrees F. Once your oven has reached it’s temperature then put the loaves in. If you have ice cubes then put a few on the bottom of the oven. They will instantly turn into steam so close the door quickly to trap the steam in. This does 2 things. Steam helps create a crunchy outer crust that is delicious. It also help to keep the crust from forming too fast which will inhibit its ability to rise.
TO SCORE OR NOT TO SCORE, THAT IS THE QUESTION: I wanted to make this tutorial accessible to anyone with basic kitchen items. Most people don’t have a “lame” (pronounced lah-m, not lay-mm), so it’s not absolutely necessary that you score (cut) your loaves, but you can if you want. Scoring your bread helps the steam escape through the hole that you want it to instead of creating a different opening and escaping that way. You can also use a sharp knife. Simply cut about 1/2 inch deep into your dough. Your movement should be fluid and should be the full length of the loaf. Do this before putting your loaves into the oven.
BAKING TIME: BAKE for 30-40 minutes at 475 degrees F. I usually go as long as the loaf will let me without burning the outside to ensure that the middle is done. Some good indicators that your loaf is fully cooked is the coloring. Is the top a darker brown. If yes, then take the loaf out of the pan and check the sides. Are the sides a dark brown? If yes, tap the bottom. Does it sound hollow? If yes, it’s a good chance that your loaf is done. After it’s done, take it out and put it on a cooling rack. Let it rest until it is cool if you can. There is something about hot fresh bread that is pretty irresistible so don’t feel too bad if you can’t wait. To be perfectly honest, I never do.
STORAGE: Wait until the loaf has fully cooled to wrap or put in a bag for keeping. Otherwise it will trap in moisture which could make soggy bread or increase chances of mold. This loaf freezes great, so if you can’t eat both loaves fast enough, put one in the freezer for later. To thaw, simply sit it on the counter overnight or for a few hours in the sun. Don’t microwave it or it will be a soggy mess.
ENJOY!!!


Reilly
27 Feb 2021Do you have a process for sourdough bread bowls per chance? Love this recipe for bread!
Heather
21 Apr 2021Hi Reilly! Thank you so much for your kind words! I don’t have a bread bowl recipe…yet. You’ve inspired me! I imagine you could use the same process, but just cut the dough in quarters, and maybe add a bit more flour to keep it shaped well. I’ll have to do some experimentations!